New Twilight Character ")
Originally uploaded by Jun Madayag
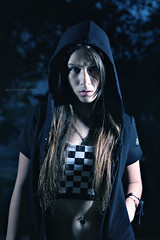
This is a shot I have done last October with my favorite teen model Nikki. My objective of this shot was to create an edgy look. so i have lighted the model so.
For the lighting I have used Elinchrome Ranger Quadra positioned on the left and the right side of the model to create the edgy feel.
My Camera setting was:
Camera: Canon EOS 5D Mark II
Exposure: 0.005 sec (1/200)
Aperture: f/5.0
Focal Length: 70 mm
ISO Speed: 200
On post processing I used Photoshop CS3 and the plugin of Niks software. Below is the workflow:
1. Resized the image 8x12
2. levels adjustment: Image>adjustment>levels>options under algorithms click enhance monochromatic contrast then ok. Still on levels go to Channel and shoose blue and adjust the middle slider to left then choose channel red and adjust middle slider to the right. All adjustment is to my taste. Then press ok.
3.Unsharp Mask to remove the hazy look: Filter>sharpen>unsharp Mask>A=20 ar=60
4.Instead of niks software to adjust contrast you can add an adjustment layer and choose Brightnes and contrast and adjust contrast to taste.
5.Flatten the image
6. Final sharpening use this method:
Duplicate Background layer
Background copy
USM 18-40-0
USM 150-.3-0
Edit>Fade USM 100% in Darken Mode
USM 150-.3-0
Edit>Fade USM 50% in Lighten Mode
The final sharpening could create a little noise. If so just add a a layer mask with black and using a white brush tool just reveal the areas you want to appear sharper like eyes, hair,texture of the clothes etc.
Let me know how this works with your image.
Again I am not a pro in PS and what I do is based on what I have learned throughout the years in the net.


No comments:
Post a Comment